We’ve all been there: you are halfway through a project, you know you have the perfect blue ribbon, but it is buried inside a cardboard box. Your creative flow stops cold while you dig through tangled embroidery floss and scattered beads. This familiar frustration—often called the "relatable chaos" effect—happens when your craft supplies storage turns into a messy pile rather than a functional system. Have you ever bought a duplicate glue gun just because you couldn't find your original one?
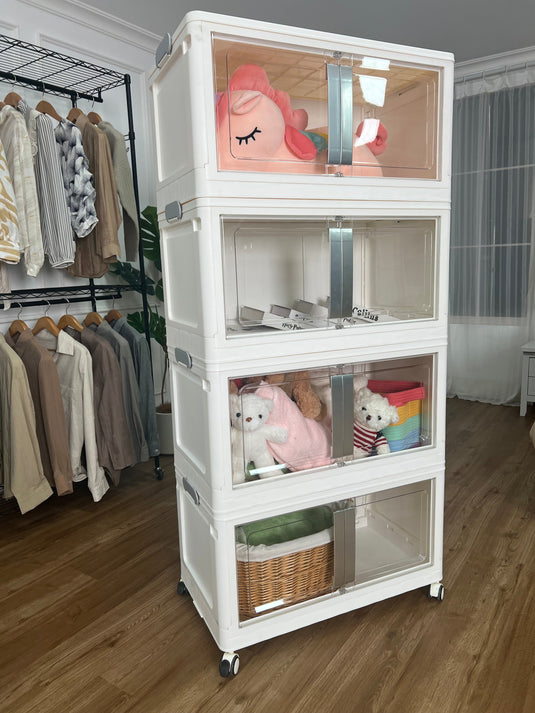
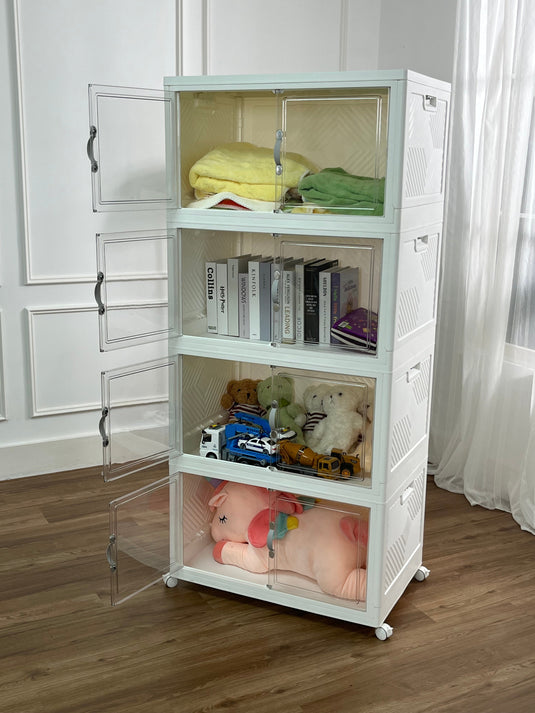
Imagine transforming that overwhelming mess into a workspace where every item is visible and perfectly reachable. Multi-layer bins make this possible by acting as a vertical filing cabinet for your creativity. Instead of spreading shallow boxes across your valuable desk space, vertical storage logic teaches us to build upward. Building up keeps your table completely clear for actually making things, which is the absolute secret to thriving in a small craft corner or apartment setup.
According to professional organizers, having a visual inventory of your materials saves crafters an average of fifteen minutes of setup and cleanup time per session. You stop searching and start creating the moment you sit down. A clear, stackable drawer system removes the friction from your hobby, replacing stress with the simple joy of clicking a neatly packed bin into place.
Getting to that beautiful, professional-level finish line requires a simple plan. Start by sorting your stash using the "Like-with-Like" method, grouping items by their specific job. Whether you want to organize craft room shelves or just clear off a tiny folding desk, mastering multi-layer bins will permanently transform how you work.
Why Vertical Storage Beats Flat Shelving for Small Craft Spaces
It is easy to watch a clean table disappear under a sprawling mess of yarn and paper scraps. Spreading supplies horizontally instantly consumes your precious work surface. By building upward instead of outward, you save desk space and instantly gain room to create. Maximizing vertical storage space in small craft rooms keeps tools close without sacrificing your tabletop.
Deep, flat shelves often create a black hole where expensive beads go to be forgotten. Think of a cluttered kitchen pantry where cans shoved to the back lead to accidental duplicate purchases. Building up solves this by putting everything on display. A quick glance at a tall, clear tower tells you exactly where your favorite washi tape lives without forcing you to dig.
True flexibility comes from choosing stackable modular containers that easily grow alongside your hobby. If you pick up a new craft next month, you can simply snap another layer onto your existing setup instead of buying entirely new furniture.
The 'Like-with-Like' Rule: Grouping Your Supplies for Maximum Flow
Dumping tools into one big bin inevitably leads to the dreaded "junk drawer" effect, where everything slowly migrates into a tangled pile. Your creative flow stops cold when digging past knitting needles just to find a glue stick. The secret to preventing this frustrating supply migration is the "Like-with-Like" rule.
When you learn how to categorize craft supplies by project type, you instantly eliminate decision fatigue during setup. While every hobbyist's space varies, you can usually break your inventory down into these four essential categories:
-
Adhesives/Glues: Hot glue guns, tape runners, and liquid cements.
-
Cutting Tools: Scissors, craft knives, and rotary cutters.
-
Textiles/Ribbons: Yarn skeins, fabric scraps, and twine.
-
Embellishments: Beads, sequins, and buttons.
Think of this system like a well-organized kitchen cutlery drawer where forks never mingle with spoons. When sorting small embellishments or tiny hardware, keeping them strictly with their functional cousins ensures you never lose a crucial piece halfway through a design. If it cuts, it goes in the tool drawer; if it sticks, it stays with the adhesives.
By assigning these specific groups to their own dedicated layers, your items finally gain a permanent home.
The 'Prime Real Estate' Strategy: Sorting Layers by Frequency of Use
With your supplies neatly grouped, the next secret is deciding where those categories belong in your stack. Just like a kitchen counter where the coffee maker sits front-and-center while holiday platters hide away, your most accessible bin is your "Prime Real Estate." Reserving this top layer for your "daily drivers"—like everyday scissors and tape—saves you from daily digging while optimizing craft table surface area for actual creating.
Creating an ergonomic workspace setup for hobbyist crafters means mapping these bin layers directly to your physical reach. Layers at your natural hand-height should hold tools you grab constantly to prevent unnecessary bending or stretching. As you move down the stack, the contents must become progressively less frequent to your routine, saving the lower tiers for your monthly project kits or seasonal supplies.
Stashing those rarely used supplies at the base provides a crucial structural benefit when you strategically place heavy items on the bottom for stability. A top-heavy tower is simply a recipe for disastrous spills.
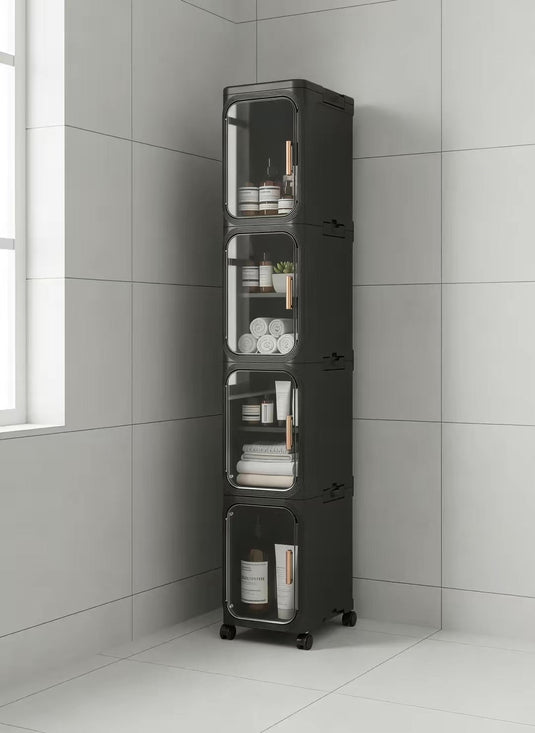
Heavy-Duty Stacking vs. Lightweight Acrylic: Choosing the Right Bin for Your Materials
While crystal-clear containers are popular, not all plastics are created equal. When choosing between heavy-duty stacking bins vs lightweight acrylic organizers, consider the actual weight of your supplies. Acrylic looks gorgeous, but a heavy stack of cardstock will quickly warp a thin drawer. Conversely, slightly frosted plastics might obscure your view just a bit, but they offer the structural integrity needed to hold your heaviest tools without cracking.
Matching your container material to your specific supplies prevents you from constantly replacing broken boxes. Use this quick pairing guide to protect your investments:
-
Acrylic: Perfect for lightweight, colorful items like washi tape where total visual transparency is the priority.
-
Heavy-duty Plastic: Essential for dense materials like vinyl rolls or bulk clay that require a sturdy, rigid base.
-
Fabric: Best for soft, bulky items like yarn skeins that need flexible, breathable sides rather than hard walls.
Sometimes your creative process moves from your dedicated craft corner to the living room couch. If you frequently migrate to different rooms, upgrading to portable multi-tier bins with carrying handles ensures your carefully sorted tools travel safely without shifting or spilling.
Taming Tiny Embellishments with Tiered Compartment Trays
There is an undeniable moment of panic when a container of seed beads or sewing pins slips from our hands, threatening to scatter hundreds of microscopic pieces across the floor. To eliminate this dreaded spill risk, the secret lies in utilizing compartment locking mechanisms. These specialized closures ensure that even if a tray takes a tumble, every single sequin stays securely confined to its designated section.
Finding the perfect shade of eyelet shouldn't require dumping out an entire box. By incorporating transparent drawer dividers for easy item visibility, you instantly turn a chaotic jumble into a beautifully color-coded display. This micro-organization approach lets you scan your entire inventory at a glance, saving you precious minutes of setup time while keeping your creative momentum flowing perfectly uninterrupted.
Taking this system a step further involves grouping these tiny materials into dedicated project kits that are ready to travel. When you start sorting small embellishments in tiered compartment trays, you can dedicate one specific layer to a single jewelry piece or card-making design. Grabbing that one pre-sorted tray means you have exactly what you need for a grab-and-go crafting session.
Storing Vinyl Rolls and Bulky Items Without Losing the Surface of Your Table
Those colorful rolls of vinyl and bulky fabrics can quickly transform your workspace into an obstacle course. Shifting to a vertical roll storage method is a game-changer that can instantly save 70% of your tabletop space. This upright approach naturally establishes simple inventory management for frequent DIY projects by keeping every material clearly visible at a glance.
To prevent these tubes from unspooling into a tangled mess, you need the right technique. One of the best ways to organize vinyl rolls in deep bins is to follow a quick, three-step method:
-
Rubber Band or Clip: Secure the middle of each tube with a loose hair tie or snap bracelet to stop the edges from peeling.
-
Vertical Placement: Stand the secured rolls upright rather than stacking them flat like firewood.
-
Deep-Bin Nesting: Pack the rolls snugly together in tall, clear containers so they support each other and won't tip over.
This clever nesting strategy provides built-in visual inventory tracking, ensuring you see exactly what colors you have left to easily avoid duplicate purchases.
Professional Labeling Systems That Keep Your Tidy Room Tidy Forever
Now that your supplies are beautifully stacked, the secret to maintaining your craft space is eliminating cleanup guesswork. Effective labeling systems for clear plastic storage units tap directly into re-homing psychology. By creating a definitive "home" for every single tool, you drastically reduce the mental load of deciding where things belong after an exhausting creative project.
Readability is your biggest priority for making this functional. Choose high-contrast labels, like bold black text on crisp white backgrounds, ensuring maximum visibility from across the room. This supports the "3-Second Rule," meaning you should be able to locate any item instantly without digging. You can easily pair these bold tags with color-coded organization for scrapbooking materials, helping your brain register supply locations in a flash.
Beautifully marked drawers act as a subtle behavioral cue to respect your own system. When a bin clearly states "Adhesives," you are far less likely to toss random scraps inside.
The 'One-In, One-Out' Maintenance Routine for a Forever-Organized Space
Craft store sales are always tempting, but bringing home new treasures without a plan is exactly how the dreaded junk drawer returns. The secret to preventing supply overflow with stackable modular containers is letting the physical space dictate your limits. Think of your bins like a baking pan—once it is full, you cannot add more batter without making a mess. When a drawer reaches its natural capacity, embrace the "One-In, One-Out" rule: for every new spool of ribbon you buy, an unloved one must be donated.
Keeping your setup highly functional also requires a quick, seasonal 3-month audit to ruthlessly remove dried-out glue pens or frayed yarn. Treat this quarterly checkup as a recurring step-by-step decluttering guide for cluttered workspaces. By opening just one drawer at a time to test markers and toss unusable scraps, you effortlessly protect your prime real estate.
Finally, lock in that Pinterest-worthy look with just five minutes of daily tidying. Because everything now has a labeled home, dropping your tools back into place becomes a calming ritual rather than an exhausting chore.
Your 4-Hour Weekend Transformation: A Final Action Plan for a Pro Craft Room
You started this journey staring at a tangled mountain of supplies, letting the mess steal your creative energy. Now, you have the exact blueprint for how to organize your craft room like a pro using multi-layer bins. You are no longer just hiding clutter; you are building an accessible, customized system that actively supports your art.
Block out a morning this weekend to apply your new skills using this simple timeline:
-
Hour 1: The Great Sort
-
Hour 2: The Bin Selection
-
Hour 3: The Layering
-
Hour 4: The Labeling
Following this weekend plan allows you to officially reclaim your creativity by removing the "mess barrier." When you fully commit to the "vertical lifestyle," your workspace quickly transitions from a stressful junk drawer into an inspiring sanctuary. You will instantly recognize the success of your hard work by the satisfying clink of a bin clicking securely into place.
Applying these fresh craft room ideas provides the immediate relief of a completely clear tabletop. You have finally built a permanent, visible home for every stray bead and ribbon—which means you can spend less time searching, and much more time creating.